
Is it difficult to install a rooftop tent?
Worried that installing a rooftop tent is a huge, technical job? This fear stops many potential buyers. You just want a simple process to get your customers adventure-ready quickly.
No, it is not difficult to install a rooftop tent. For most models, it is a straightforward, two-person job that takes about 30 to 60 minutes. You only need basic tools, and most of the required hardware comes included with the tent itself.
I talk to procurement directors like you all the time, and a common concern is the end-user experience. You need to be sure the products you stock won't cause headaches for your retailers or their customers. The idea of lifting and attaching a large tent to a car roof sounds intimidating at first. I get it. But I've been through this process hundreds of times, both in our factory and helping new clients. The reality is much simpler than the perception. Let's break down the questions your team and your customers will have, so you can see just how manageable it is.
What tools are needed to install a rooftop tent?
Don't own a professional set of tools? Worried you need expensive, specialized equipment? This false assumption can stop a sale before it even begins, but it's completely unnecessary.
You only need a few basic tools for installation. Most rooftop tents, including all of ours at Sensu Outdoor, come with the necessary wrenches and mounting hardware. You will likely just need a step ladder and a tape measure from your own garage.

When we designed our rooftop tents, we knew that a simple installation was critical. Your customers want to go camping, not spend a whole day feeling like a frustrated mechanic. That’s why the tool list is intentionally short. I remember my first time helping a friend with his tent. I brought my entire toolbox, thinking I'd be a hero. In the end, we only used the small wrench that came in the box and my tape measure. Here’s a more detailed look at what is and isn't needed.
Tools and Hardware Breakdown
It's best to think of the tools in two categories: what we provide, and what the customer should have on hand.
- Included with the Tent: Our kits are designed to be nearly all-inclusive. We provide the mounting brackets that slide into the tent's base channels and all the nuts and bolts to secure them to a roof rack. We also include the correct size wrench to tighten these nuts.
- Customer-Provided Tools: These are common household items. A step ladder is essential for safely reaching the vehicle's roof. A tape measure is very important to ensure the tent is centered on the vehicle from side to side and front to back.
Here is a simple table you can share with your retailers.
| Tool Category | Specific Item | Purpose |
|---|---|---|
| Included in Box | Wrench (specific size) | To tighten mounting bolts |
| Mounting Plates & Bolts | To connect the tent to the rack | |
| Customer Should Have | Step Ladder / Stool | For safe access to the roof |
| Tape Measure | To center the tent accurately | |
| A Friend | For safe lifting |
By making this clear, you show customers that they already have almost everything they need. It lowers the barrier to purchase and builds confidence.
What precautions should be taken when installing a rooftop tent for the first time?
Are you concerned about your customers lifting a heavy tent onto their car? Worried they might scratch the paint or, worse, install it unsafely? This first-time anxiety is totally normal.
Always lift with a partner to avoid injury and protect your vehicle. Before you start, confirm your roof rack's dynamic weight capacity exceeds the tent's weight. Finally, double-check that all nuts and bolts are tightened securely before driving anywhere.

Safety and product care are not negotiable. As a manager, you know that a bad installation experience can lead to a product return or a negative review, which impacts your business. We take this very seriously. A successful first installation creates a happy, long-term customer. I always tell new users to treat it like a simple project: prepare first, then execute carefully. The whole process is about being methodical, not about needing special skills. Here are the critical safety steps laid out clearly.
Key Safety and Care Checklist
These are the non-negotiable steps for a safe first-time installation.
1. Pre-Installation Checks
Your vehicle and roof rack are the foundation. You must confirm they are up to the task. Check the vehicle owner's manual for the "dynamic weight capacity" – the weight it can safely carry while in motion. Your roof rack also has its own dynamic weight limit. The rack's limit must be higher than the weight of the rooftop tent. This is the single most important check.
2. The Lifting and Placement Process
A rooftop tent weighs between 50-80 kg. This is absolutely a two-person lift. Trying it alone is the fastest way to injure your back or damage your vehicle. Place a blanket on the roof for protection if you are worried about scratches. Lift with your legs, not your back, and carefully place the tent onto the crossbars of the roof rack.
3. Secure and Double-Check
Once the tent is on the rack, use a tape measure to center it. Then, install the mounting hardware hand-tight. Before the final tightening, ensure the tent opens correctly without hitting the back of the car. Tighten the bolts evenly, like you would tighten the lug nuts on a wheel. After your first short trip (around town), pull over and re-check that all the bolts are still tight. They can sometimes settle slightly.
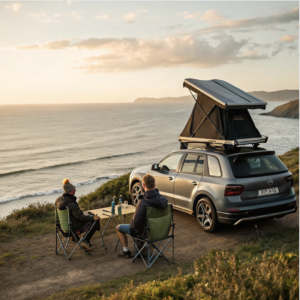
Is there any difference in installing a rooftop tent for different models?
You supply retailers across Europe, so you see all kinds of vehicles. Is the installation process for a small hatchback the same as for a large van? This uncertainty can make it hard to advise your retailers.
The core installation method is the same for nearly all vehicles because the tent attaches to the roof rack, not the car itself. The main difference is adjusting the crossbar positions on the roof rack to align with the tent's mounting tracks.

This is a great question, and it shows you're thinking about the real-world challenges your customers face. The good news is that modern rooftop tents and roof racks are designed for universal compatibility. The system is wonderfully simple. The tent has parallel tracks on the bottom, and the vehicle has crossbars on top. The goal is simply to connect them securely. Our patented designs at Sensu Outdoor actually enhance this flexibility. Here is how the vehicle type influences the small details of the job.
Adapting Installation for Different Vehicles
The core principles don't change, but the vehicle's size and shape require minor adjustments.
The Roof Rack is Key
The tent doesn't care if it's on a Fiat or a Ford. It only cares about the roof rack it sits on. The most common adjustment is the "crossbar spread" – the distance between the front and rear bars. Our tents have long mounting tracks to accommodate a wide range of spreads, from small cars to large vans. This is a key feature, as it guarantees a fit on almost any standard setup your customers may have.
Vehicle-Specific Considerations
While the method is the same, the experience can feel different.
| Vehicle Type | Key Consideration | Our Solution's Advantage |
|---|---|---|
| Small Car / Hatchback | Less roof space. Centering is important to avoid overhang. The shorter roof may limit crossbar spread. | Our flexible tracks easily accommodate a narrower crossbar spread, ensuring a secure fit. |
| SUV / Truck | Higher vehicle height makes lifting the tent up more challenging. Requires a sturdy step ladder. | This is a physical challenge, but our mounting hardware is easy to handle, even when reaching up. |
| Van / Large 4x4 | Lots of roof space. The main choice is where to position the tent (front, middle, back) for best balance. | The extensive length of our patented mounting tracks gives users maximum choice for positioning. |
Ultimately, you can confidently tell your retailers that one tent model can serve a huge variety of vehicles, which simplifies their inventory and boosts their sales potential.
Conclusion
Installing a rooftop tent is a simple, manageable task. With a friend and basic tools, your customers can be ready for their next adventure in less than an hour.

You may also be interested in:

How Does Desktop Injection Molding Work?
Injection molding has long been a cornerstone of mass manufacturing, enabling the production of complex plastic parts with speed and precision. Traditionally, this technology has been reserved for large industrial

Hello world!
Welcome to WordPress. This is your first post. Edit or delete it, then start writing!